Joomla is one of the most popular free online website builders for beginners and pros alike. This guide will teach you how to make website using Joomla.
If you are looking for our free designs go to the free joomlate templates page.
If you don’t want to read the whole article, here are all steps you need to follow:
- Get Web Hosting and Register Your Domain name. We recommend Bluehost. Use this special link to get the lowest price and a free domain name in your first year with them (amazing deal!!!!).
- Setup the website through your web hosting account. I takes 3-4 clicks to set it up.
- Download a free template from your website or make your own template.
- Add content/articles/pages to your website.
All this shouldn’t take more than 20-30 minutes and it’s really easy with no programming skills needed.
How To Start Making a Joomla Website
There are dozens of content management systems (CMS) out there. Joomla is one of them.

Perhaps the most famous content management system you have heard of is WordPress. It has nearly 17 million users, according to data from Ionos Digital Guide.
Joomla is the second most popular free CMS in the world. It has nearly 2.5 million users.
Joomla can be slightly more complex to use than WordPress. But it is similarly beginner-friendly and there are tons of free joomla templates available.
You can use Joomla for most types of websites, such as:
- Personal blogs or websites
- Small business websites
- Online publications, like e-zines
- Corporate web portals
- Non-commercial websites
- Online stores
The latest version of Joomla available is 3.x. You will need the following system requirements to install the software on your computer:
- PHP: 7.1+ (recommended), 5.3.10 (minimum)
- Supported Databases: MySQL with InnoDB support 5.3+ (recommended), 5.1(minimum); SQL Server 10.50.1600.1+ (recommended), 10.50.1600.1(minimum); PostgreSQL 9.1+ (recommended), 8.3.18 (minimum)
- Supported Web Servers: Microsoft IIS 7; Apache 2.4+(recommended), 0 (minimum); Nginx 1.8+(recommended), 1.0 (minimum)
Why Most People Use Joomla to Build a Website
Joomla is the go-to CMS for some of the best-known companies and governments in the world. IKEA websites, for example, are powered by Joomla. So are the Guggenheim Museum’s websites.
What are the most popular reasons for using Joomla? Let’s find out below:
- Joomla is free to use
- It’s significantly easy to install and configure the CMS
- Joomla has a huge library of extensions
- Users can write their own extensions and share with other Joomla users
- The CMS has a huge and active support community
- Joomla has a number of free and easy-to-use user templates
- The updated version of the CMS has newer security features
Joomla is similar to WordPress cost wise. Like WordPress. Joomla offers a set of free and paid extensions.
Compared to Drupal, Joomla doesn’t require as much hardware power. It’s less costly and less complex as well.
Most people use Joomla as a user-friendly alternative to WordPress. It’s easy to use, but if you need help, you can find online support as well.
Building a Joomla Website from Scratch
Below is a comprehensive step-by-step guide to building a website using Joomla. You will have to start by opening a hosting account and choosing a name for your website:
Step 1: Buy Web Hosting and Register a Domain Name
Before you get Joomla, there are two important tasks to complete:
- Decide on a domain name, or a website address, for your site
- Buy a web hosting plan with a reputed provider. We strongly recommend Bluehost because it’s our top rated web hosting provider. And it’s affordable too.
You can do either first. Most people go directly to buying a web hosting plan.
Getting a Web Hosting Plan
Your Joomla website has to be hosted on the web via a server. Otherwise, people can’t access your site.
A web hosting plan allows you to get your Joomla site online under certain conditions. Plans can vary. There are also many different types of plans to choose from.
There are lots of web hosting providers out there, but we think Bluehost is the best for joomla websites. You may find many more hosting providers locally as well, but they may be more expensive with less features.

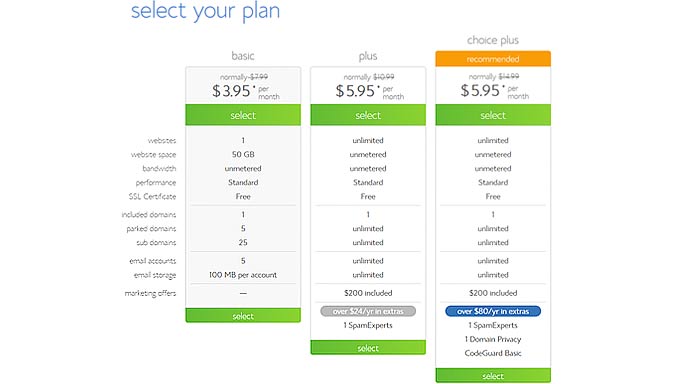
You should also decide on a type of plan. The cheapest packages are shared hosting plans. Meaning, you share server space with other websites.
Shared hosting plans are good for beginners. But as your site grows, you might want to upgrade to a dedicated, cloud, reseller, or a similar hosting plan.
With a dedicated or cloud hosting plan, you don’t have to share bandwidth with other websites. So there’s less risk of your website going offline.
Once you have chosen a type of package and a provider, go ahead and open an account. The web host would direct on how you can do this.
Pro Tip: Choose a web host that offers 1-click install for Joomla, like Bluehost. This would make your life much easier when it comes to setting up your website.
Register Your Domain Name
Once you have opened an account, there would be a step to choose a domain name for your website. This is the address for your site that appears on the browsers.
It’s a simple and straightforward step. But you must carefully choose the site name. You can’t change the web address once you’ve picked it.
Bluehost offers free domain names in the first year of web hosting. Don’t miss this offer.
This is how their domain registration page looks like:
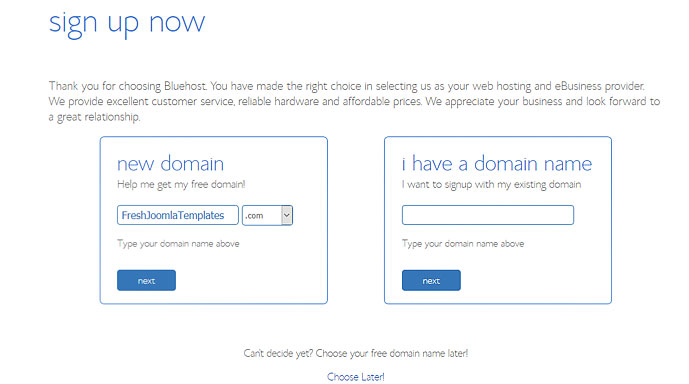
Choose a unique domain name for your site. It has to be easy for users to remember and easy enough to type. So avoid complicated names and don’t include symbols or numbers in the address either.
Make sure the name you chose isn’t similar to another website already online. That may lead to confusion for users.
Carefully choose the site name and register it with the web host. You should register the domain for at least 10 years.
Complete Registration
After you have registered your domain name, there might be few other details to fill in. Do this and complete opening an account with the web host.
Now you can log into the web host account. It’s time to install Joomla.
Step 2: Install Joomla and Set Up Your Website
Now you can begin building your website. But first, you need to get the Joomla client installed on your computer.
Installing Joomla
Remember the system requirements mentioned above? Check them and make sure your computer and server meet the minimum requirements.
There are two ways to install Joomla: 1-click (convenient) and manual.
If you chose a Joomla-friendly web host, you can go directly to 1-click install. It means what it says. With a single click, the web host’s software would install Joomla on your computer.
These are the CMSs that Bluehost offers 1 click installs for:

It’s convenient. And you can start using the CMS right away.
The manual method is a bit complicated. You will have to complete the following:
- Download the latest Joomla release from the official website.
- Extract the downloaded files to your computer.
- Transfer the installation files to the server using an FTP
- Create and configure a MySQL database for Joomla.
- Install the files.
You can get the download files and complete details on the official Joomla website. (Pro Tip: Don’t use any other site to download Joomla.) Again, you can avoid the hassle of manual install with 1-click.
Log on To Joomla
The next step involves logging onto your Joomla account using a username and a password. You should use this account as the administrator for the website you make.
Joomla will prompt you to choose an admin language. You can add more languages to the site with the “install languages” button.
Now, you should have access to a demo site. You can go to https://launch.joomla.org/ to quickly deploy a fully functioning website.
Set Up Your Website
When you are logged in as the administrator, you would at the “Control Panel” for your website. This is the main user interface. You should become familiar with the setting.
You would see a left-hand side menu with the following:
- Content
- Structure
- Users
- Configuration
- Extensions
- Maintenance
Don’t miss the taskbar at the top with the following:
- System
- Users
- Menus
- Content
- Components
- Extensions
- Help
Creating a new “article” on Joomla opens a new web page. But you would have to code this from scratch. There’s an easier way to design your website.
Step 3: Design Your Website
Finally, it’s time to design your website. You can start by selecting and customizing a template. Then you can add modules, new pages, and more functionalities.
Choose and Install a Template
A template is a layout for a website. It’s pre-coded, so you won’t have to spend time typing HTML code. Joomla offers both free and paid (premium) templates for users to choose.
Choosing a Joomla Template
Joomla templates are not available in a central directly, unfortunately. So you will have to look for these on the web. There are specialized shops just for Joomla templates. You can try one of the following:
- Joomla-Monster
- SiteGround
- Joomdev
- Joomlart
- The M Expert
- Rocket Theme
- Joomshaper
There are many more you can look up on a popular search engine.
However, when choosing a theme, pay attention to the following characteristics:
- Responsiveness—The template should have compatibility with all popular browsers. It must be responsive, meaning the template should be easy to view on mobile device screens.
- Customization—The template should be highly customizable. You should be able to alter it to make the template look unique. Otherwise, your website would look like the rest that use the same template.
- Update Availability—The template should have regular updates to tackle security issues. Also, the template should update as Joomla updates.
- Customer support—Technical support by the template creator would be a major plus if (really, when) you run into trouble.
Check all of the above. Then, you should install the template.
Installing a Joomla Template
Once you purchase or freely download a template, it would show up as a zip file on your computer. You can then upload the template to Joomla under “Extensions.”
After this go to “Extensions” on the Control Panel. Then, click on install to load the template.
After you have installed the template, you need to activate it. Under “Extensions,” you should see
“Templates”. Under that “Styles.”
Go to “Styles” and click on the star button next to the template you chose. Doing so makes the template the default look for the website.
Customize the Template
Customizing the template makes it your own. Customization options vary by the template package.
In general, you should be able to change things like colors, fonts, and logos on the template. The more control you have, the more you can make it look unique.
Move things around to change the default look. Customize the template as you like. Remember, any customization you make should improve the navigability of your website.
Add New Pages
A website doesn’t usually have just one page. Joomla calls individual web pages “articles.”
On your left-hand side menu, there’s an option to add, edit and, delete articles. It’s relatively easy to find.
When you add a new article, you can edit it using a word processor-style interface. You have to click “publish” to actually make the new web page available.
Create a Menu
You can custom add a navigation menu for your website. It might be necessary if the template doesn’t have one.
Joomla has a “Menu” option on the left-hand side. Use it to add a new menu. This should take you to a new screen.
Obviously, you need to assign web pages as items in the menu. On the new screen, navigate to “Menu Item Type” and “Select Article.” You can now assign new pages to the menu.
The navigate to “Menu Items” on the left-hand side again. This should take you to the window that allows you to change the text on the menu.
Add Content with Modules
Customization only changes the existing objects on the template. Your website still needs headlines, text, images, videos—you know, content.
In Joomla, “Modules” are used to add content. Think of these as the building blocks of your website.
Start by going to the preview mode of the template. Go to System > Global Configuration > Templates. Enable the “Preview Module” option.
Now you will see where you can place modules. Switch off the preview mode to start assigning modules.
To create modules, go to Extensions > Modules. There will already be a list of modules for components available by default on the template.
You can create new modules from here. Simply select the “custom module” option.
It would take you to a window that looks like a word processor. You can add text and images to create content for your website.
You can add, edit, and format new content here. Click on the “publish” button to add the content to the template.
The tricky part is to place the modules. But with practice, you will get better at it.
Step 4: Add Extensions
Extensions are also known as plug-ins. These are like coded shortcuts that add extra functionality to your website.
Extensions can help you track the health of your website. You can add things like a shopping cart to your website.
Joomla has a central extensions database at extensions.joomla.org. There are thousands of extensions to choose from.
You will be able to install the Extensions directly from the directory. Then go to Extensions tab on the Control Panel to access what you downloaded.
Step 5: Preview
As you develop the website, you can preview it. This will show how your design appears to other web users.
To access a preview, do the following:
- Go to Site>Global Configuration to access the “backend” of your website.
- Say “yes” to set the site offline option. Click Save.
- Click on the site name on the top right corner to access the “frontend” of your website.
- Check out the preview.
Use the preview to perfect the layout of your website.
Launch Your Website!
Once you have followed the above steps, you will finally be ready to take your website live.

This is called moving your site from a local host to a live host.
Follow these steps to take your site live:
- Upload your Joomla site to the server using FTP.
- Create a MySQL database (you may have already completed these two steps).
- Edit the configuration.php file. Type in your database name, username, and password. If using a different IP, indicate that in the hostname.
- Replace the configuration.php file.
- Export your local Joomla site database to the corresponding location in the server database. You can use an extension for this.
When you are moving files around, always remember to back up the originals. It’s highly recommended to use a backup extension for this.
Once you have uploaded the website to the server, then it’s done. Your site will be accessible online.